
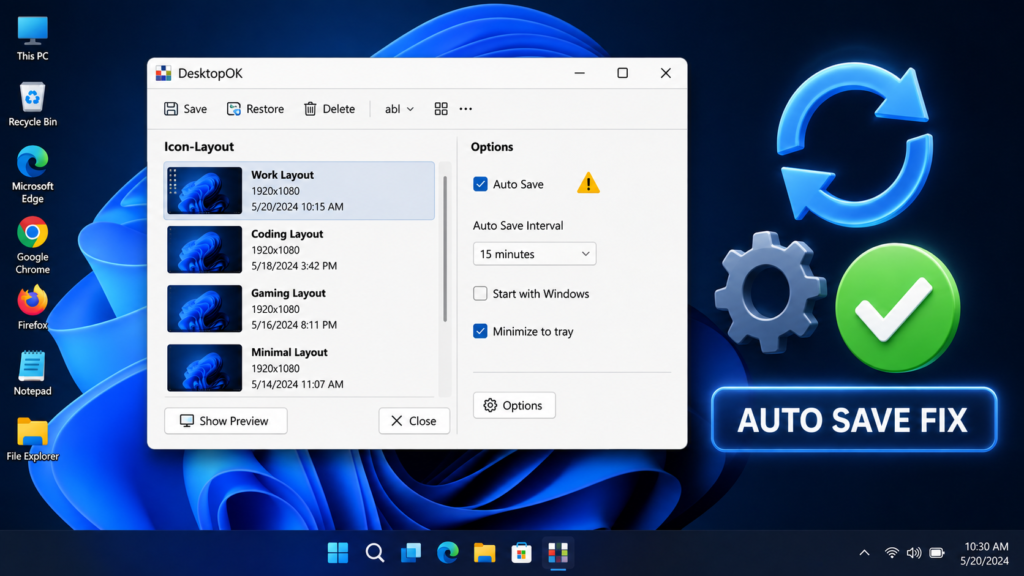
DesktopOK Auto Save not working can leave your carefully arranged desktop icons unprotected. You may enable automatic saving, restart Windows, change the display resolution, or connect another monitor only to discover that no recent layout was created. In some cases, DesktopOK appears to be running normally, but the Auto-Save entries remain unchanged.
This problem usually occurs because Auto-Save is not fully activated, DesktopOK closes after startup, Windows automatically rearranges the icons, or the program cannot update its configuration. This guide explains how to identify the exact cause, repair the feature, test it correctly, and prevent the problem from returning.
What Does DesktopOK Auto Save Do?
DesktopOK Auto Save records the current positions of your Windows desktop icons at scheduled intervals. Instead of manually creating a new layout every time you move an icon, the program can maintain a rotating collection of recent desktop arrangements.
The official documentation states that Auto-Save can retain up to 32 recent icon layouts. When the selected limit is reached, the oldest automatic entry is removed to make room for a newer one. An optional setting can also tell DesktopOK to create a new entry only when the desktop layout has actually changed.
This feature is useful when:
- Changing the screen resolution
- Connecting or disconnecting an external monitor
- Using a laptop docking station
- Playing games that switch display modes
- Updating a graphics driver
- Rearranging desktop shortcuts regularly
- Switching between different monitor configurations
Auto-Save does not necessarily restore an arrangement by itself. Saving layouts, saving at shutdown, restoring at startup, and manually restoring an entry are separate functions. Understanding this difference is important when troubleshooting the feature.
Signs That DesktopOK Auto Save Is Not Working
You may have an Auto-Save problem when one or more of the following happens:
- No Auto-Save entries appear in the main DesktopOK window.
- The newest automatic layout has an old date or time.
- The number of saved entries never changes.
- Manual Save works, but automatic saving does not.
- DesktopOK saves a layout only while its main window is open.
- Automatic layouts disappear after restarting Windows.
- DesktopOK does not start when you sign in.
- An Auto-Save entry exists but restores the wrong icon arrangement.
- The program keeps saving identical layouts unnecessarily.
Before changing advanced Windows settings, perform a simple test. Move one desktop icon to a clearly different location, keep DesktopOK running for longer than the selected saving interval, and then check whether a new Auto-Save entry appears. This confirms whether the problem affects saving, startup, or restoration.
1. Confirm That Auto-Save Is Actually Enabled
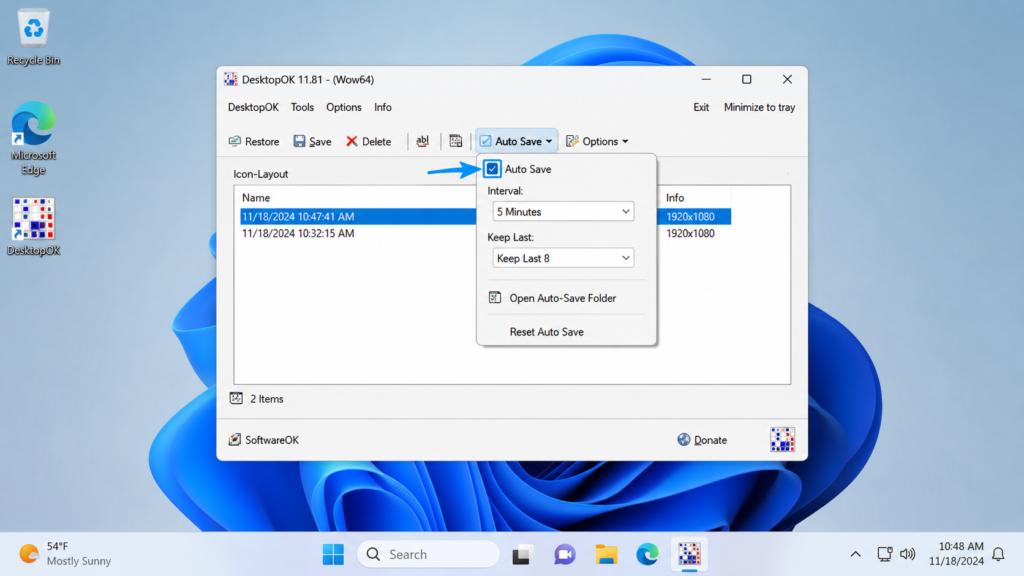
Selecting how many layouts DesktopOK should keep does not always activate the complete Auto-Save function. The official DesktopOK FAQ specifically notes that users must activate Auto-Save rather than only selecting a retention value such as “Keep last 4.”
Open DesktopOK and look for the Auto-Save settings under the Options or Settings menu. The exact wording may differ slightly depending on the program version and selected language.
Check the following options:
- Auto-Save is enabled.
- A valid saving interval is selected.
- The number of layouts to retain is greater than zero.
- DesktopOK is allowed to continue running.
- The setting is still enabled after closing and reopening the program.
After enabling the feature, create one manual layout as a baseline. Move an icon, wait for the selected interval, and look for a new entry whose name begins with Auto-Save.
Do not rename the automatic entry while testing. According to the official FAQ, renaming an Auto-Save entry can prevent DesktopOK from continuing to recognize it as an automatic record.
2. Use a Shorter Interval During Testing
A long saving interval can make a working feature appear broken. For example, when DesktopOK is configured to save every hour, checking the layout list after only a few minutes will not produce a new entry.
Temporarily choose a short interval while troubleshooting. A period of a few minutes is easier to test than a long schedule.
Use this test:
- Enable Auto-Save.
- Select a short interval.
- Save the settings.
- Move one desktop shortcut.
- Keep DesktopOK running.
- Wait until the interval passes.
- Refresh or inspect the layout list.
Once you confirm that the feature works, select an interval that matches how often your desktop changes. Saving too frequently may create many similar records, while saving too rarely may leave recent changes unprotected.
3. Check the “Only If Layout Changes” Setting
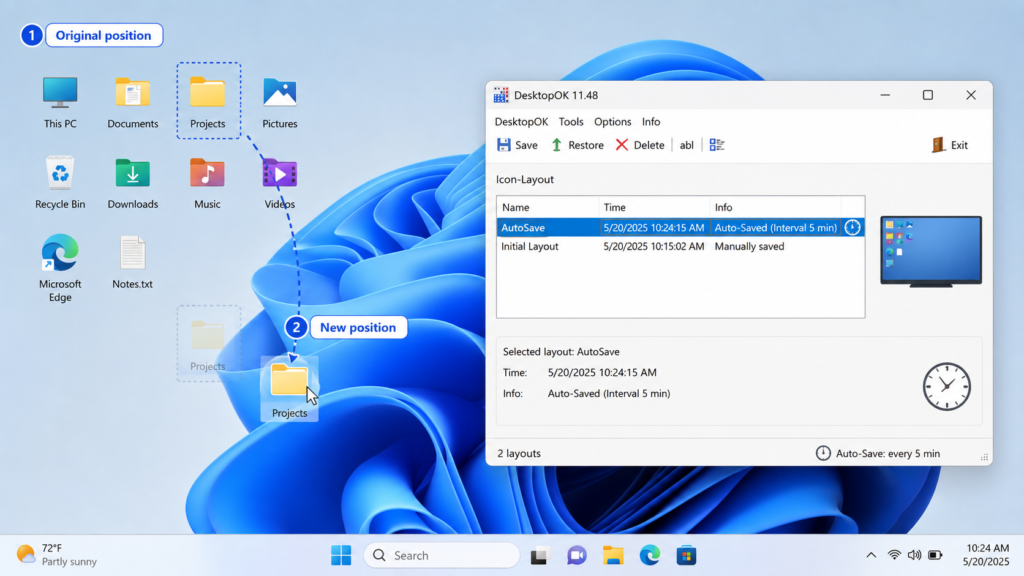
DesktopOK includes an option that creates a new automatic entry only when the icon arrangement has changed. This prevents the list from filling with identical layouts.
When this option is enabled, DesktopOK may skip a scheduled save because no icon has moved. That behavior is normal and does not mean Auto-Save has failed.
To test it correctly:
- Move an icon to a different grid position.
- Create or remove a temporary desktop shortcut.
- Wait for the next automatic saving interval.
- Check the date and time of the newest layout.
Avoid moving an icon and immediately placing it back in the same position. DesktopOK may detect the final arrangement as unchanged and skip the save.
Temporarily disabling “Only If Layout Changes” can also help determine whether layout-change detection is confusing. Re-enable it after testing to keep the automatic layout list organized.
4. Keep DesktopOK Running in the Background
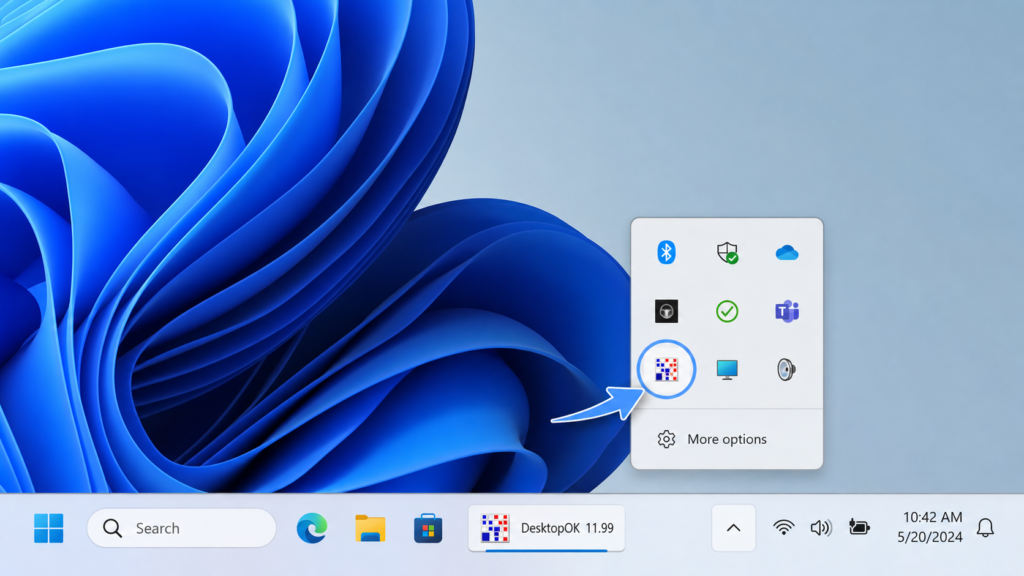
Auto-Save cannot create timed layouts when DesktopOK is completely closed. Closing the main program window may either minimize the application to the notification area or exit it, depending on the selected settings.
After closing the window, check the system tray near the Windows clock. You may need to select the hidden-icons arrow to find the DesktopOK icon.
When no tray icon appears:
- Open DesktopOK again.
- Check its tray or minimize settings.
- Select the option that sends the program to the tray instead of exiting.
- Confirm that DesktopOK remains visible in Task Manager.
Open Task Manager by pressing Ctrl + Shift + Esc. Look for DesktopOK under Processes or Details. When it is not present, the application is no longer running and cannot perform interval-based saves.
Keeping DesktopOK in the tray is usually more reliable than repeatedly opening and closing it throughout the day.
5. Make DesktopOK Start with Windows
Auto-Save may work during one session but stop after every restart because DesktopOK is not launching when you sign in. DesktopOK officially supports launching at Windows startup, but the startup option must be enabled, and the executable path must remain valid.
First, check the startup option inside DesktopOK. Restart the computer and confirm that the program appears in the notification area.
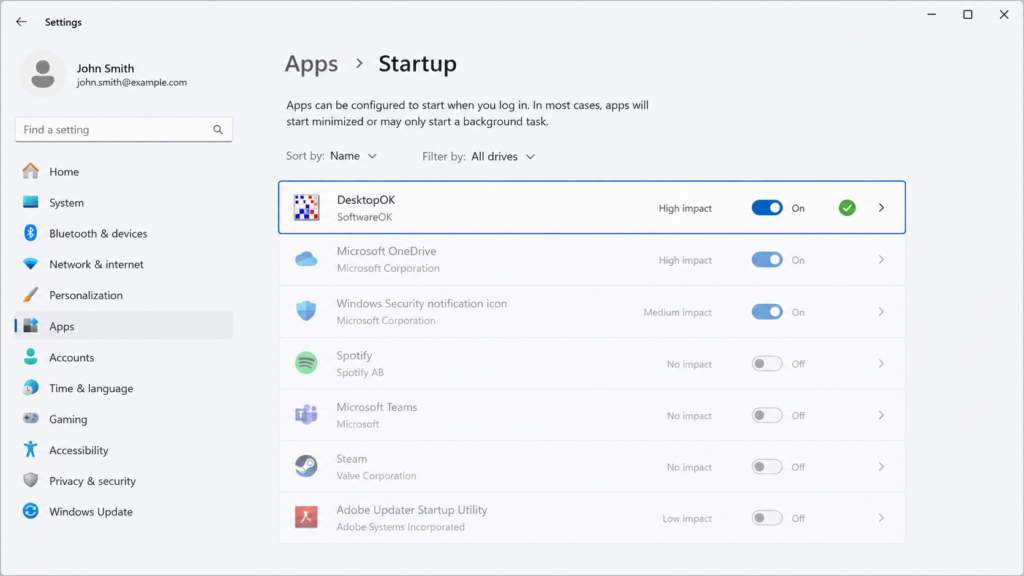
You can also inspect Windows startup settings:
- Open Settings.
- Select Apps.
- Open Startup.
- Find DesktopOK.
- Turn its startup toggle on.
Microsoft also allows startup applications to be managed through the Startup Apps section of Task Manager. Programs that are not registered in the startup list can be launched by placing a shortcut in the current user’s shell:startup folder.
To use the Startup folder:
- Press
Windows + R. - Enter
shell:startup. - Press Enter.
- Create a shortcut to the DesktopOK executable in this folder.
- Restart Windows and check whether DesktopOK launches.
Do not place the actual portable executable inside a temporary Downloads or archive folder. Move it to a permanent folder first, and then create the startup shortcut. Otherwise, moving or deleting the original file will break the shortcut.
6. Disable Windows Auto Arrange Icons
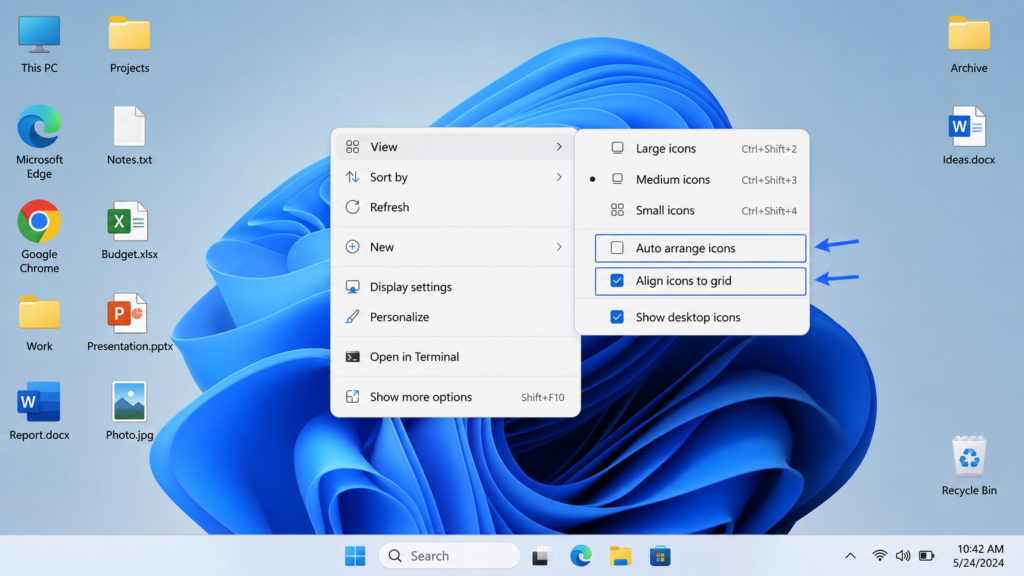
DesktopOK may successfully save and restore a layout, but Windows can immediately rearrange the icons again when Auto Arrange is enabled. This can make the restored arrangement look incorrect or create the impression that Auto-Save saved the wrong positions.
The DesktopOK developer identifies automatic icon arrangement as one of the most common causes of restoration problems.
To disable it:
- Right-click an empty area of the desktop.
- Open View.
- Clear Auto arrange icons.
- Keep Align icons to grid enabled when you prefer evenly spaced shortcuts.
Auto Arrange forces icons into an automatic sequence. Align to Grid only keeps them aligned to invisible spacing points, so it normally works correctly with DesktopOK.
After changing this option, arrange the icons again and create a fresh manual layout. Older layouts may have been recorded while a different desktop arrangement setting was active.
7. Verify the DesktopOK Configuration Location
DesktopOK needs to save its settings and layout data to a configuration file. If that file is unavailable, read-only, damaged, or stored in a folder that no longer exists, Auto-Save may fail even though the program opens normally.
In standard use, newer DesktopOK versions can store DesktopOK.ini under the user’s AppData DesktopOK folder. For portable operation, an INI file placed beside the executable allows the program to keep its configuration in the working directory.
Problems commonly appear when DesktopOK is:
- Running directly from a ZIP archive
- Stored in a temporary extraction folder
- Located on a disconnected USB drive
- Launched from a read-only directory
- Moved without updating its startup shortcut
- Using an old or damaged INI file
Move the application to a stable folder such as:
C:\Tools\DesktopOK
Avoid placing it inside a protected Windows system directory.
Close DesktopOK before moving its files. Reopen it from the new location, enable Auto-Save again, and verify that the settings remain active after restarting the application.
8. Reset a Damaged Desktop OK Configuration
A damaged or inconsistent configuration file can prevent new settings from being retained. This may happen after an interrupted update, forced shutdown, storage error, or manual configuration edit.
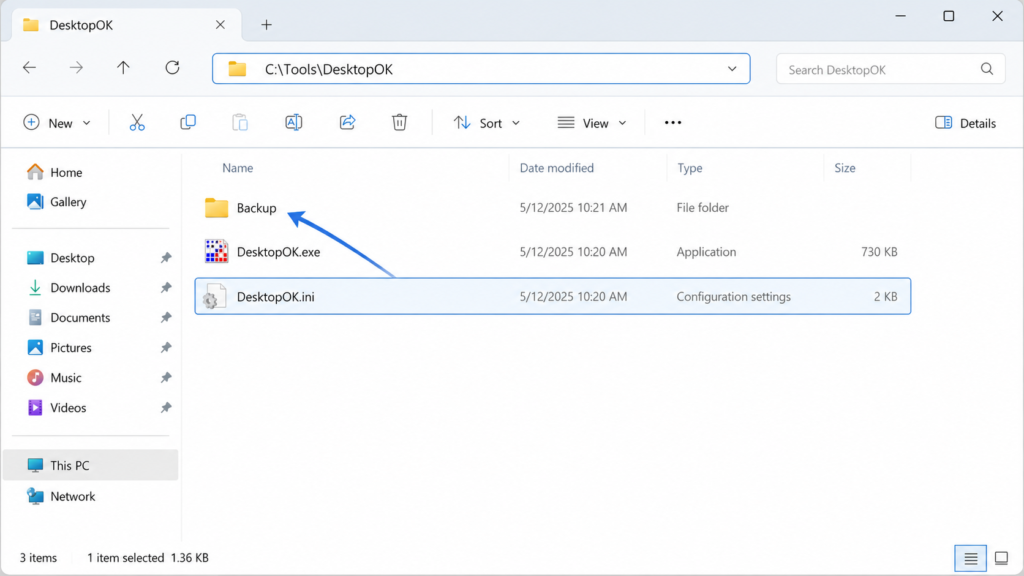
Before resetting anything, create a backup of your important layouts.
Then use this process:
- Exit DesktopOK completely.
- Find the
DesktopOK.inifile. - Copy it to a separate backup folder.
- Rename the original file to
DesktopOK-old.ini. - Start DesktopOK again.
- Configure Auto-Save from the beginning.
- Test whether a new automatic entry appears.
Renaming the file is safer than deleting it because the original configuration remains available if you need to restore it.
A new configuration will also reset preferences that are unrelated to Auto-Save. Review tray behavior, startup settings, icon-size options, language, and retention limits after the reset.
9. Update DesktopOK to the Current Version
Older DesktopOK releases may contain bugs or compatibility limitations that have already been corrected. The official version history includes previous fixes and improvements related to automatic icon saving, restoring layouts, high-DPI displays, Windows updates, and new desktop icons.
As of July 16, 2026, the official release is DesktopOK 12.66. The developer lists minor fixes and general optimization in this version, while version 12.58 included improvements to desktop layout saving across supported Windows systems.
Before updating:
- Close DesktopOK.
- Back up
DesktopOK.ini. - Export any important layouts when needed.
- Download the correct package from the official source.
- Extract the new files to a normal folder.
- Start the updated executable.
- Confirm that your previous layouts are visible.
- Test Auto-Save with a short interval.
Do not keep several outdated DesktopOK copies in different folders. You may configure Auto-Save in one copy while Windows starts another copy with different settings.
10. Check for Duplicate DesktopOK Processes
Running more than one copy of DesktopOK can create confusing results. One instance may use the AppData configuration while another portable instance reads an INI file from its own folder.
Open Task Manager and check whether multiple DesktopOK processes are active. End all copies, then launch only the version you intend to use.
Also inspect:
- The Windows Startup folder
- Startup Apps in Task Manager
- Desktop shortcuts
- Pinned taskbar shortcuts
- Old extracted DesktopOK folders
- Scheduled tasks
Remove obsolete shortcuts rather than deleting the current executable. After cleaning the duplicate entries, restart Windows and verify that only one copy launches.
11. Test the Save Folder for Permission Problems
DesktopOK may fail to update its configuration when the working folder has restricted permissions. This is more likely when the portable version is stored inside Program Files, a protected network folder, or another user’s directory.
Test the application from a normal folder in your user account. Do not immediately run it as administrator unless the program specifically reports a permission problem. Running the same program sometimes as administrator and sometimes normally can create separate access or configuration behavior.
Also check whether security software displays a notification when DesktopOK attempts to write its settings. Rather than disabling antivirus protection, review the blocked-app history and allow the legitimate DesktopOK executable only after confirming its source.
12. Use Task Scheduler When Normal Startup Fails
The Windows Startup folder is normally sufficient, but Task Scheduler can be used when DesktopOK must launch with a delay after sign-in.
A delayed start can help on computers where Windows Explorer, display drivers, cloud desktop shortcuts, or monitor-management software take longer to initialize.
Create a task that:
- Starts when your user account logs on
- Launches the correct DesktopOK executable
- Uses a short delay after sign-in
- Runs only one instance
- Uses a permanent executable path
Microsoft documents that Task Scheduler can start applications when Windows boots or when a user logs on.
After creating the task, disable any duplicate Startup folder shortcut. Using multiple startup methods at the same time can launch more than one instance.
13. Create a Manual Baseline Layout
Auto-Save should not be your only backup. Automatic entries rotate over time, and the oldest records are eventually removed.
Arrange the desktop exactly as required and create a manual layout with a clear name, such as:
- Main Desktop Layout
- Laptop Only
- Dual Monitor Setup
- Office Monitor
- Gaming Resolution
- Before Windows Update
Manual layouts provide stable restore points, while Auto-Save protects recent changes.
For a detailed manual backup process, refer to How to Save and Restore Desktop Icons Using DesktopOK. Users running the application without installation can also review DesktopOK Portable Version Complete Guide for Beginners.
How to Confirm That Auto Save Is Fixed
Use a controlled test rather than waiting for a real desktop problem.
- Open DesktopOK.
- Enable Auto-Save.
- Select a short temporary interval.
- Enable a small retention limit.
- Create one manual baseline layout.
- Move two desktop icons.
- Keep DesktopOK running in the tray.
- Wait until the interval has passed.
- Open the layout list.
- Confirm that a new Auto-Save entry has appeared.
- Move the icons again.
- Restore the new automatic entry.
The feature is working correctly when the entry has a recent timestamp and restores the icons to the positions recorded during the test.
After testing, increase the interval to your preferred value.
Auto Save vs Shutdown Save vs Startup Restore
These three options serve different purposes.
Auto Save
Auto Save creates layouts at timed intervals while DesktopOK is running. It is useful for protecting changes made during an active Windows session.
Save at Windows Shutdown
This option creates a special layout when Windows shuts down. It records the icon arrangement near the end of the session.
Restore at Windows Startup
This option restores the shutdown- or startup-related layout when Windows begins. It is designed for users who want their last desktop arrangement automatically applied after signing in.
The official DesktopOK documentation explains that the shutdown-save feature creates a dedicated Shutdown_Startup entry, which can then be used by the restore-at-startup option. This is separate from the rotating Auto-Save list.
Enable only the functions that match your workflow. Automatically restoring an old layout at startup can overwrite a newer arrangement when the wrong entry is selected.
Common Auto Save Problems After Display Changes
Desktop icon layouts are connected to the available desktop area. A layout recorded for one display configuration may not restore perfectly in another.
Possible triggers include:
- Changing display resolution
- Switching display scaling
- Disconnecting a monitor
- Moving the Windows taskbar
- Changing the primary display
- Connecting through Remote Desktop
- Updating a graphics driver
- Switching from duplicate to extended displays
Create separate named layouts for important monitor configurations. The existing DesktopOK Multi Monitor Setup Guide explains how to organize layouts for different screen arrangements.
Do not overwrite your main layout immediately after Windows temporarily detects the wrong monitor resolution. Wait until the display configuration is stable.
Mistakes to Avoid
Avoid these actions while troubleshooting:
- Renaming every Auto-Save entry
- Running DesktopOK directly from a compressed archive
- Closing the application instead of minimizing it
- Keeping multiple portable copies active
- Enabling Windows Auto Arrange Icons
- Testing without moving any icon
- Using a very long interval during diagnosis
- Deleting the configuration before creating a backup
- Moving the executable after creating a startup shortcut
- Depending entirely on rotating automatic entries
Changing several settings at once also makes the real cause difficult to identify. Test one fix at a time and check whether a new Auto-Save entry appears.
Frequently Asked Questions
Why is DesktopOK not creating Auto-Save entries?
Auto-Save may not be fully enabled, DesktopOK may have exited, the saving interval may not have passed, or the “Only If Layout Changes” option may have detected no change.
Does DesktopOK need to stay open for Auto-Save?
The program must remain running. It can stay minimized in the notification area rather than remaining open as a full window.
Why does “Keep Last 4” not save my icons?
The retention setting controls how many records are kept. You must also activate the Auto-Save function.
Why does DesktopOK save only after I move an icon?
The “Only If Layout Changes” setting may be enabled. DesktopOK then skips identical layouts.
How many automatic layouts can DesktopOK store?
DesktopOK can retain up to 32 recent Auto-Save layouts before older automatic records are removed.
Can I rename an Auto-Save entry?
You can rename it, but DesktopOK may stop recognizing it as an automatic entry. Use manual named layouts for permanent backups.
Why does the restored layout move again?
Windows Auto Arrange Icons may be enabled, or the current resolution, scaling, monitor configuration, and taskbar area may differ from the saved environment.
Does Auto-Save restore icons automatically?
Not necessarily. Auto-Save records layouts. Automatic restoration at startup is controlled by a separate option.
Why does Auto-Save stop after restarting Windows?
DesktopOK may not be configured to launch at sign-in, its startup shortcut may be broken, or the executable may have been moved.
Can the portable version use Auto-Save?
Yes, but the executable and its configuration should be stored in a writable, permanent folder rather than a ZIP archive or temporary location.
Should I run DesktopOK as administrator?
Normal use usually does not require administrator rights. Use elevated access only when a specific system or folder permission requires it.
Will resetting DesktopOK delete my layouts?
Resetting or replacing the INI configuration can remove access to existing settings and saved layouts. Back up the configuration before making changes.
Conclusion
DesktopOK Auto Save Not Working is usually caused by an incomplete Auto-Save configuration, a closed background process, a broken startup path, Windows Auto Arrange Icons, or a damaged configuration file. Start by confirming that Auto-Save itself is enabled, shortening the interval for testing, and keeping DesktopOK active in the system tray.
When basic settings are correct, check startup behavior, duplicate copies, the configuration location, folder permissions, and the installed version. Create at least one permanent manual layout alongside the rotating Auto-Save entries. This gives you a reliable restore point even when automatic records are replaced or a display change produces an unwanted arrangement.